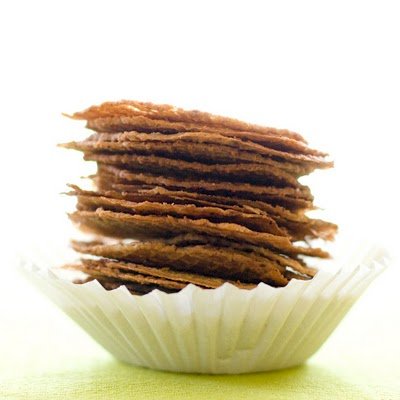
Friday, April 30, 2010

peekfrostings

2010 Ice Cream Cupcake Roundup - Win a Cuisinart Ice Cream Maker and an OXO Prize Pack


UPDATE: The entry period is over. Check out all of the incredible entries!


It's time again for the Cupcake Project and Scoopalicious Ice Cream Cupcake Roundup - your opportunity to showcase your amazing ice cream cupcake creations just in time for Summer! For a brief tutorial to get you started, check out my post on ice cream cupcakes. For tons of inspiration, check out the drool-worthy entries from 2008 and 2009.

This year, we've raised the stakes with some AMAZING prizes! Check this out, people:

One grand prize winner will win a Cuisinart ICE-30BC Pure Indulgence 2-Quart Automatic Frozen Yogurt, Sorbet, and Ice Cream Maker


AND an incredible prize pack from OXO including OXO Good Grips Solid Stainless Steel Ice Cream Scoop, Oxo Good Grips 2-Cup Angled Measuring Cup, OXO Good Grips 1169600 3-Piece Mixing Bowl Set, Blue/Green/Yellow, Oxo Good Grips Bent Icing Knife, and Oxo Good Grips PRO Grater!!


Two semifinalists and two voters will also win the OXO prize pack shown above.  Read below for the complete rules. You'll be surprised to find out who is judging this year's contest.

Official Rules:


  • Dates: You can enter any time through May 31, 2010.
  • How to Enter:  
  1. Write a post on your blog during the month of May and include a link to both this post and to the post at Scoopalicious. (If you don't have a blog, you can still enter, but why not start one?)  Sorry, we are allowing just one entry per person this year - so make it count!  International readers are welcome to enter, but prizes can not be shipped internationally.  You will win bragging rights and you will have the opportunity to gift your prizes to any person or organization in the United States.
  2. Upload a photo of your cupcake to our Flickr group.  Please upload as large a photo as possible so that we can be sure to best showcase it in the roundup.
  3. Then, complete the entry form
  • Entrant Voting: All ice cream cupcake roundup entrants are required to vote for their favorite ice cream cupcake some time during the second week of June.  Entrants must pick their first, second, and third favorite ice cream cupcakes and they are not allowed to vote for their own cupcakes.  Entrants that do not vote will become ineligible to win.  (To summarize - you are being judged by your cupcake creating peers - no pressure!)  The top three cupcakes as chosen by the entrants will go on to the public vote.  All three entrant-voted winners will win OXO prize packs, but the public will determine who wins the Cuisinart Ice Cream Maker.  In the event of a tie, the cupcake that received the most second place votes will win.  If there is still a tie, we will look at third place votes.  If there is still a tie, we will have a quick - one day only - vote between the two tied cupcakes.
  • Public Voting:  Public voting will take place during the second half of June.  Anyone with a valid email address will have an opportunity to choose their favorite of the top three cupcakes.  You'll want to vote because two voters will win the same prize pack as the semi-finalists!  In the event of a tie, we will have a quick - one day only - vote between the two tied cupcakes.
Special thanks to Cuisinart and OXO for offering our incredible prizes!

Good luck!!

Wednesday, April 28, 2010

peekfrostings

Gingersnap Cookies - Making Them Is a Snap!


Gingersnap cookies are a snap to make and oh so handy to have around; not in a "gingersnap cookies can clean your car for you" kind of way (though a container of gingersnap cookies could certainly make your Subaru smell better than any air freshener), but in a snacking and baking kind of way.  Gingersnap cookies make a simple morning/afternoon/evening/3AM treat.  Gingersnap cookies also are fabulous crushed.  Crushed gingersnap cookies can turn any ice cream or fresh fruit sorbet into something a bit more memorable.  When crushed, gingersnap cookies can also be the stars of pie crusts or cup-pie crusts.


Speaking of crusts, I used these gingersnap cookies to make the crust (and the topping) for my original mini ginger lemon poppyseed cheesecakes recipe that is currently featured on Paula Deen.


Whether or not you make these cookies from scratch (and I hope you do), I highly encourage you to try out the cheesecakes (get the recipe on Paula Deen).  They are worlds better than lemon poppyseed muffins and they scream Spring! Surprise Mom with some cheesecakes on Mother's Day and you'll have one happy mama.

Gingersnap Cookie Recipe


I got the recipe for these gingersnap cookies from All Recipes.  I opted to not roll my cookies in cinnamon and sugar as the original recipe suggested because I didn't think the cookies needed it.
  • 2 C sifted all-purpose flour
  • 1 T ground ginger
  • 2 t baking soda
  • 1 t ground cinnamon
  • 1/2 t salt
  • 3/4 C shortening (I used room-temperature unsalted butter)
  • 1 C sugar
  • 1 egg
  • 1/4 C dark molasses
  • 1/3 C cinnamon sugar (I skipped this)
  1. Preheat oven to 350 F.
  2. Sift the flour, ginger, baking soda, cinnamon, and salt into a mixing bowl. 
  3. Stir the mixture to blend evenly, and sift a second time into another bowl.
  4. Place the shortening/butter into a mixing bowl and beat until creamy. 
  5. Gradually beat in the white sugar.
  6. Beat in the egg and dark molasses. 
  7. Sift 1/3 of the flour mixture into the shortening mixture; stir to thoroughly blend. 
  8. Sift in the remaining flour mixture, and mix together until a soft dough forms.
  9. Pinch off small amounts of dough and roll into 1 inch diameter balls (or any size that you like) between your hands. 
  10. Roll each ball in cinnamon sugar (if you dig that), and place 2 inches apart on an ungreased baking sheet.
  11. Bake in preheated oven until the tops are rounded and slightly cracked, about 10 minutes. 
  12. Cool cookies on a wire rack. Store in an airtight container.

Sunday, April 25, 2010

peekfrostings

TV, or Yes, Theresa, I am a Real Person


What happens when your pickle and ice cream cupcakes get written up in People magazine?  It turns out that you get to be on local TV (the clip is at the bottom of this post)!

If you are not from St. Louis (or even if you are) you may not recognize the dude on the left in this photo - it's Tim Ezell from the Fox morning show.  The lovely lady on the right is my prego friend Lori who got to come on the show to taste test my cupcakes.  It was great for my nerves to have a friend along.  As for the person in the middle holding the plate of cupcakes, that's me!  I thought that I'd shown enough pictures of me on the blog that my readers would have some idea of what I looked like, but judging from Theresa's tweet after the episode aired, I guess not:

To show you even more of what a real person I am, I will point out that my biggest dilemma about being on TV was what the heck to do with my hair.  I've been into braids recently...

...but I thought maybe that would be too cutesy.  I took a poll in my hula hoop class (clearly they are all fashion experts) and it was a unanimous vote for hair down - so that's what I did. (Yes, I wrote this whole section just for an excuse to throw in another picture of Myles.  Next time, maybe he'll get to come on the news with me.)

My biggest fear about being on the show was having to scoop ice cream on air. Would the ice cream be too hard?  Would I grunt?  When you watch the clip, you'll see that I had the opposite problem; it was too soft and stuck to the scoop - oh, well!

The folks at FOX 2 were super nice and I look forward to the opportunity to feed them cupcakes again some time in the future!

Here's the clip:

Wednesday, April 21, 2010

peekfrostings

Waffled Cupcakes - A Waffleizer Duel


Once upon a time, a cupcake blogger (me) was browsing one of her favorite eye candy sites (Tastespotting or Foodgawker) and came upon a link to a blog called Waffleizer.  She quickly stopped by for a visit and learned that Waffleizer was not a blog about waffles; rather, it was a blog about taking ordinary food and putting it in a waffle maker to answer the question, "Will it waffle?"  The cupcake blogger immediately fell in love (after all, the unwritten motto for her site is "Will it cupcake?").

One day, the cupcake blogger noticed that Marisa (her former editor at Slashfood and author of the awesome Food in Jars) wrote a guest post on Waffleizer - jealousy ensued.  The cupcake blogger wanted a chance to be a part of the waffle challenge.  To get what you want, you have to ask.  So, our heroine dropped Waffleizer creator Daniel "King of Waffles" an email and asked if she could create a waffle cupcake for his blog.  Rather than allowing her post on Waffleizer, King Daniel decided to treat the request as a duel.  They would each create a waffled cupcake to share with the world - may the best cupcake win.

This blog post is a play by play of that epic duel.

The cupcake blogger and King Daniel agreed that the cupcake flavor would be strawberry.

King Daniel consulted The Flavor Bible to try to come up with a unique strawberry cupcake flavor combination.


The Flavor Bible: The Essential Guide to Culinary Creativity, Based on the Wisdom of America's Most Imaginative Chefs 

The cupcake blogger just happened to be in Borders and also looked at The Flavor Bible. (Is this cheating or smart playing?  You decide.)

The cupcake blogger considered flavor after flavor. She even had dreams about strawberry cupcakes.  But, ultimately she decided on the simple American classic - the strawberry shortcake.

King Daniel wrote the cupcake blogger to say that he was struggling with the challenge. 

The cupcake blogger bravely warmed up her waffle iron and took out an unfrosted strawberry shortcake cupcake.


She greased up her waffle iron, sliced her strawberry shortcake in half, and put it on the grill.


She closed the lid, waited about 30 seconds or so, and...


Voila!! It worked! The cupcake blogger had achieved a waffled strawberry shortcake cupcake on the first try. Touche!

She put the first piece back in the wrapper and topped it with strawberries and balsamic whipped cream.  Then, she put the second piece on top and covered it with more strawberries and balsamic whipped cream, and crowned the whole thing with a waffled chocolate wafer.


Despite her clear success, the cupcake blogger still doubted whether she had gone far enough, so she kept going.  In her next rendition of the waffled cupcakes, she cut two cupcakes in half, waffled both of them, made three layers of waffle/strawberry/whipped cream and topped the creation with the fourth piece of waffled cupcake.


In this configuration, the eater is actually consuming two cupcakes in a single wrapper - pure gluttony.

Still, the cupcake blogger feared that King Daniel would call her foul - she had not waffled a whole cupcake.  She had cut it up.  So...


Head over to Waffleizer to see how King Daniel fared.

Tuesday, April 20, 2010

peekfrostings

Strawberry Shortcake Cupcakes with Balsamic Whipped Cream


As a child, I loved Strawberry Shortcake

and I loved jump roping and singing about strawberry shortcake.

 Yes, I realize that you can't really understand this girl, but it was the best strawberry shortcake jump rope video that I could find.

But, I never actually ate strawberry shortcake because I didn't like whipped cream. This was due to the fact that I never had fresh whipped cream. Fresh whipped cream = WOW! Whipped cream in the can = Eww. No thanks! Call me a whipped cream snob - I don't care!

When I made my olive oil cupcakes with balsamic whipped cream, Katy of Sugarlaws said that she used the balsamic whipped cream in a strawberry shortcake.  I filed the idea away until now!  No one could tell what the secret ingredient was in the whipped cream (especially because I used white balsamic)  - they just knew that they LOVED it!

The Strawberry Shortcake Cupcake Recipe


I adapted the strawberry shortcakes on Allrecipes to make my strawberry shortcake cupcakes, and I used the balsamic whipped cream recipe from Sugarlaws.

Yield: 12 cupcakes

  • 1 lb fresh strawberries, roughly chopped
  • 1/4 C sugar
  • 2 1/4 C all-purpose flour
  • 2 t baking powder
  • 2 T sugar
  • 1/4 t salt
  • 1/2 C unsalted butter (unlike most cupcake recipes, the butter should be straight out of the refrigerator, not room temperature)
  • 1 egg, beaten
  • 2/3 C milk
  • 1 C heavy cream
  • 1/4 C sugar (or more, your preference)
  • 2 T balsamic vinegar (It will look prettier if you use white balsamic vinegar.)
  1. Slice the strawberries and toss them with 1/2 cup of white sugar. Set aside.
  2. In a medium mixing bowl (don't use your electric mixer, make this recipe by hand to avoid over mixing) combine the flour, baking powder, 2 tablespoons white sugar, and the salt.
  3. Cut in the butter and mix by hand until the mixture resembles coarse crumbs.
  4. Make a well in the center and add the beaten egg and milk. 
  5. Stir until just combined.
  6. Divide the batter evenly among the cupcake wrappers.
  7. Bake at 425 F for 15 minutes or until golden brown.
  8. Let cool partially in pan on wire rack.
  9. While the cupcakes are cooling, whip heavy whipping cream until it looks like whipped cream.
  10. Mix in 1/4 cup sugar and balsamic vinegar until just combined.
  11. Slice partially cooled cupcakes in half, making two layers. 
  12. Place half of the strawberries on one layer and top with some whipped cream.
  13. Replace the top halves of the cupcakes.
  14. Top with remaining strawberries and cover with the whipped cream
Waffling

Next up, what happens when these strawberry shortcake cupcakes meet the waffle iron?

Sunday, April 18, 2010

peekfrostings

Chocolate Wafers - Paper Thin and Totally Addictive


Chocolate wafers are the Pringles of the cookie world - once you eat one paper thin chocolate wafer, you just can't stop. These chocolate wafers taste like sugar cones with a touch of chocolate or chocolate fortune cookies (I've always held the belief that sugar cones and fortune cookies are the same thing).  Fans of Italian pizzelles should also note that these chocolate wafers use a pizzelle recipe.  However, instead of making them in a pizzelle maker (which would have given them a much more decorative pattern), I made the chocolate wafers in my mini waffle cone maker.   I realize that not everyone has a pizzelle maker or a mini waffle cone maker; I guess April is as good a time as any to start your Christmas list.


If I had wanted to, I could have rolled the chocolate wafers up into little cones like I did with last year's mini ice cream cones.


Or, perhaps I could have folded them like fortune cookies and put a note inside.  But, I left the chocolate wafers as little circles, ate some, and put some on top of my waffled cupcakes

Chocolate Wafer Recipe


Full credit for this recipe goes to Andrea of Andrea's Recipes.  She made this recipe in a pizzelle maker, but other than that, I didn't make any modifications. I am reprinting the recipe below with my notes:

  • 1/2 C granulated sugar
  • zest of one orange, optional
  • 3 eggs, beaten
  • 1/2 C cold water
  • 1/2 C (1 stick) unsalted butter, melted and brought back to room temperature
  • 1/2 t vanilla
  • 3/4 C sifted all-purpose flour
  • 1/4 C dutch process cocoa powder
  1. Warm the mini waffle maker while you mix the ingredients.
  2. Optionally, in a small bowl, work the orange zest into the sugar with your fingers.
  3. In the bowl of the stand mixer (or bowl with hand mixer), beat the eggs and sugar together until the mixture is light.
  4. Add the cold water, cooled butter, and vanilla.
  5. Whisk together the flour and cocoa powder, making sure there are no lumps (I had limited time and I skipped this step.  Don't do what I did. You could see the little lumps in the end product.)
  6. Add the dry mixture to the wet mixture. 
  7. Mix on low until the batter is smooth and the chocolate color is even throughout. 
  8. Pour 1 tablespoon of the batter for each cookie onto the heated and greased waffle cone maker and close the top.
  9. Cook according to the manufacturer’s directions, usually 30-60 seconds. 
  10. Gently lift with a fork or silicone spatula and transfer to a wire rack. 
  11. Store in a tin, not airtight, away from other cookies. They need some exposure to air to stay crispy.

Friday, April 16, 2010

peekfrostings

What do Jim Carrey, Jenny McCarthy, Dixie Carter, and I Have in Common?


What do Jim Carrey, Jenny McCarthy, Dixie Carter, and I Have in Common?

We are all in the April 26th issue of People Magazine!!  


People contacted me last week to see if they could use a photo of my pickle and ice cream cupcakes (umm... YES!);  lots of jumping up and down and calling everyone I knew ensued.  I wanted to post here immediately, but I figured that I should wait until the issue actually hit newsstands (just to make sure that I wasn't dreaming).

I took about ten trips to our local grocery store, Schnucks (yeah, I know, it's a funny name), looking for the issue.  Finally, I went to customer service and asked when the new issue would arrive.  I told them I was in it and the General Manager promised to call my cellphone when the new magazines were delivered.  Hours later, I got the call, rushed to the store, bought two copies (I may buy another copy every time I go to the store this week), turned to page 106, and there it was:


YAY! Thanks to all of my readers for getting me to the point where People would notice me, and thanks to any new readers coming over from People. People fans: I hope you take a minute to check out the blog and let me know if I can help answer any of your cupcake questions.

Tuesday, April 13, 2010

peekfrostings

Carrot Cake Cupcakes - Unforgettably Moist


The carrot flavor shines in these unforgettably moist carrot cake cupcakes - but the coconut, pineapple, currants, and a surprising cardamom finish makes this classic American dessert taste just a bit exotic. These carrot cake cupcakes are the best carrot cupcakes (or carrot cake) that I've ever had and I hope you'll feel the same way.

The Back Story

Two readers (Stephanie and Erin) recently asked me if I had a good carrot cake cupcake recipe.  I didn't!  I made carrot cupcakes with orange a long time ago (3 years!) and while I liked them, the orange was far more dominant than the carrot. I set out to find a killer carrot cake cupcake.

To find the best carrot cake cupcake out there, I first turned to my Twitter friends - and they came through!  The carrot cake cupcake recipe that most appealed to me was from Laureen at Eat and Be Happy (if you read her description of it, you'll want it immediately, too!).  I based my carrot cake cupcakes on hers, but (of course) I made some changes; I used coconut oil to kick up the coconut flavor, currants instead of raisins, and added cardamom to both the cake and the frosting.  Here's my adaptation of her recipe:

Carrot Cake Cupcake Recipe


Yield: 12 cupcakes

  • 1/2 C sugar
  • 3/4 t baking soda
  • 1 t baking powder
  • 1/2 t salt
  • 1/2 t cinnamon
  • 1/2 t ground cardamom
  • 1 C finely chopped carrot (about 1 large carrot) - It's easiest to do this in a food processor. If you use organic carrots and scrub them well, you don't even have to peel them first.
  • 1 C (200 g) crushed pineapple, drained
  • 1 C dessicated coconut 
  • 3 handfuls of currants (You could use raisins instead if you prefer.  You could also add a half cup of any kind of nut.)
  • 1/4 C coconut oil
  • 1/4 C unsalted butter, room temperature
  • 2 eggs
  • 1 C flour
  1. In a large bowl, combine everything but flour, eggs, oil, and butter. 
  2. Add oil and butter and stir vigorously to combine. 
  3. Add eggs in one at a time, combining well after each addition. 
  4. Add flour in 2 batches, mixing until just combined.
  5. Divide evenly among cupcake liners.
  6. Bake at 350 F for 25 minutes or until a toothpick comes out dry.
Cardamom Cream Cheese Frosting Recipe

  • 8 oz cream cheese, room temperature
  • 1/4 C unsalted butter, room temperature
  • 3 C powdered sugar
  • 2 t ground cardamom
  • 1 t vanilla extract
  1. Mix cream cheese and butter until creamy and light.
  2. Mix in powdered sugar one cup at a time. You can add more or less to get your desired consistency.
  3. Mix in cardamom and vanilla until fully integrated.
  4. Pipe or slather onto your cupcakes.
Candied Carrot Toppers

Check out my post on candied carrot toppers to learn how to make the topper for these cupcakes. Wait until just before serving to add the toppers - otherwise, they will get soggy.

Alternate Recipe

For an alternate carrot cupcake recipe, my Twitter friend Garrick suggests a carrot cake cupcake recipe using baby food.  I haven't tried it, but you may want to check it out.


UPDATE: My bloggy friend, Little Ivy, left me a comment saying that she had made carrot cupcakes with candied carrot curls on top. I went to leave her a comment (something to the effect of how I couldn't believe I had missed that post) and I saw that I had already left a comment in 2007!  So, it looks like my subconscious might have stolen her idea and not given her due credit.  Go check out her carrot cupcake post and all of her other wonderful creations.  

Sunday, April 11, 2010

peekfrostings

Candied Carrot Curls - A Unique Carrot Cupcake Topper


Why are carrot cakes and carrot cake cupcakes always topped with a piped carrot drawing?  Apple cakes don't have apple drawings on them, nor do peach cakes have little piped peaches.

Why not top your carrot cakes with the real thing?!  I found the recipe for these candied carrot curls on Epicurious (they got it from the December 2007 issue of Gourmet). 

Don't be alarmed by the number of steps in the carrot curl instructions.  I know it sounds like a lot of fussing, but making the carrot curls is really quite simple and they will easily impress your cupcake eaters.  When Bride 3.0 saw the cupcakes topped with these, she loved that they looked like little ribbons.

Here is the reprint of the recipe, along with my notes:

  • 1 large carrot (preferably fat) or 2 medium
  • 1 C water
  • 1 C sugar
  1. Peel layers from carrot lengthwise on one side with peeler until you begin to get wide slices. Peel wide strips, reserving them, until you get about 15 (there will be a few extra). (I just did the whole carrot.  I figured that it couldn't hurt to have extras.)
  2. Bring water and sugar to a boil in a small heavy saucepan, stirring until sugar has dissolved.
  3. Add carrot strips and simmer, uncovered, 15 minutes. 
  4. Strain through a sieve into a bowl, discarding syrup.
  5. Let stand 15 minutes.
  6. Preheat oven to 225 F with rack in middle.
  7. Line a large baking sheet with nonstick liner (I used parchment paper), then arrange candied carrot slices flat in 1 layer on sheet.
  1. Bake until dry but still flexible, about 30 minutes. (Leave oven on.) 
  2. Wind carrot strips, 1 at a time, around end of handle of a wooden spoon in a loose spiral, then slip off each curl and return, seam sides down, to lined baking sheet. 
  1. Return curls to oven to dry until crisp, 30 to 45 minutes more. (Some of my curls looked less curly after this step. I'm not sure why it happened - maybe they weren't seam side down, or maybe they got too dry.  I loved them anyway.)
  2. Cool completely on baking sheet.  Carrot curls can be made 5 days ahead and cooled completely, then kept in an airtight container at room temperature. Recrisp in a 250 F oven 10 minutes. (Don't put them on your cake until just before serving or they will get soggy.)
Note:  If you don't want to make carrot curls but still want to top your cupcakes with real carrots, you might consider Chockylit's carrot sprinkes.

Saturday, April 10, 2010

peekfrostings

Future Foodie Onesie Winner


There is no doubt in my mind that Rachel is helping her friend to raise a future foodie (and a linguistic genius - if the child is actually able to say pistachio at 4.5 months)!! Congrats to randomly drawn lucky number 19!

Thanks to everyone who entered the future foodie onesie giveaway for all of your great advice and encouragment. You guys are the best!

If anyone is looking for tips on raising a foodie, I'd definitely recommend reading through the comments on the giveaway post.

Sunday, April 4, 2010

peekfrostings

Future Foodie Onesie Giveaway


People often tell me how lucky Myles is growing up in a house with lots of cupcakes (no, he hasn't had one yet). What I hope he gains from my Cupcake Project is a spirit of experimentation with food (not pounds - we'll be teaching moderation). While I don't care if he's a doctor or a lawyer or good at baseball or basketball, I really hope that Jonathan and I are able to raise a foodie. I want him to care about what he puts in his body - to choose non-processed, fresh foods whenever possible - and to try new things. I'll know that there will be days when he comes home from a friend's house with a Happy Meal or eats candy whose ingredients I can't even pronounce; it's hard to avoid. But, in the end, I hope he learns to choose smoked Gouda on homemade whole grain bread over American cheese on Wonder Bread.

Myles is now seven months old and we are off to a good start with Baby-Led Weaning. But, we know that we've got a lot to learn.

Here's where you come in:

Tell me what you are doing or have done to raise a future foodie. Did it work or did it backfire? If you don't have kids, tell me about someone you know.

Your comment (with an email address) will enter you into a giveaway to win the adorable Future Foodie Onesie from the Spunky Stork (shown above on Myles) for a future foodie in your life. The onesie is made of 100% organic cotton and is super soft. It comes in two sizes, 0-6 months and 6-12 months (FYI - they run a bit big. Myles is now wearing 9 month clothes and the 6-12 month onesie is still quite huge on him).

For a second entry, share a tip, join in a conversation, or mention this giveaway on Twitter with the tag #futurefoodie.

Fine print: Limit 2 entries per person. Deadline is Friday, April 9th at 11:59 PM CDT.

To my international readers: Spunky Stork is willing to ship internationally. Yay!!

Friday, April 2, 2010

peekfrostings

Compost Cupcakes - Salty and Sweet


These compost cupcakes have so many different flavors that Bride 3.0 described the compost cupcakes as schizophrenic. What you think of these compost cupcakes will likely depend on whether you are the type of person who mixes foods on your plate.

If you are the type that greatly prefers plates with dividers (shown above) - so your peas and potatoes don't mingle - you'll hate them!

Compost cupcakes (like mud pie and dirt cake) are much better than the name reveals. The interesting thing about compost cupcakes is that they will taste different every time that you make them. The idea for compost cupcakes came from Momofuku's compost cookies. In the compost cookies, you mix your favorite salty snacks into the batter (Doritos, cheesy poofs, tortilla chips, etc.) along with your favorite sweet snacks (chocolate chips, raisins, caramel, etc.) and end up with salty/sweet deliciousness. I did the same thing with my compost cupcakes. I used pretzels, homemade goldfish crackers, cacao nibs, and Skor chips.

Compost Cupcake Recipe

To make compost cupcakes, mix your favorite salty and sweet snacks into your favorite cupcake recipe. There is no reason that you have to use the recipe below. I was in the mood for molasses, so I mixed my snacks into a molasses-based cake. The molasses flavor was a bit overpowering and next time, I might try making compost cupcakes using a more basic white cake.

Yield: 12 Cupcakes
  • 5 T unsalted butter, softened
  • 1/2 C white sugar
  • 1/2 C unsulfured molasses
  • 2 eggs
  • 1 1/4 C all-purpose flour
  • 1/4 t salt
  • 1 t baking soda
  • 1/2 C hot milk
  • 1/2 C - 1 C crushed salty snacks (I used goldfish crackers and pretzels)
  • 1/2 C - 1 C sweet snacks (I used cacao nibs and Skor chips)
  1. Cream butter and sugar.
  2. Add the molasses and eggs.
  3. Add the flour and stir until just combined.
  4. Dissolve the baking soda in the hot milk.
  5. Stir in the hot milk mixture.
  6. Stir in salty and sweet snacks until combined.
  7. Divide batter evenly between 12 cupcake liners.
  8. Bake at 350 degrees F for 20 minutes or until slightly springy to the touch.
Chocolate Goldfish Cream Cheese Frosting

One of my favorite parts of my compost cupcakes was the chocolate cream cheese frosting with crushed goldfish crackers mixed in. The crackers added just the right about of salt to cut the sweet of the frosting. I highly recommend this frosting for any cupcake. Follow the recipe for my favorite chocolate frosting and then mix in a half cup of crushed goldfish crackers (or other salty treat) at the end.

Special Thanks

Special thanks goes out to reader Casey, whose email inspired these cupcakes. I don't always make cupcakes suggested by readers, but I'm willing to entertain all suggestions - the stranger the better!
Real Time Web Analytics