Wednesday, July 29, 2009

peekfrostings

Cupcakes for Paula Deen


I am proud and truly honored to announce that beginning in October, you'll be able to find Cupcake Project cupcakes in a second location.

I'll be creating one cupcake each month from October through January for Paula Deen Online!

Don't worry, I'll still be making cupcakes here, and I'll be sure to remind you when it's time to head over to Paula Deen's site for cupcake inspiration.

Monday, July 27, 2009

peekfrostings

Vegan Chocolate Cupcakes with Basil


Vegan chocolate cupcakes can easily rival any non-vegan counterpart. These vegan chocolate cupcakes are light and bouncy like Hostess cupcakes - but leagues better. The best part of the vegan chocolate cupcakes was how well they domed. As my friend NZ Cupcake Queen (author of The Cupcake Project - not to be confused with this blog, Cupcake Project) says:

Feeling that a vegan chocolate cupcake (delectable or not) was uninteresting, I decided to make it a chocolate basil cupcake. Basil tastes strikingly similar to mint - so much so that my tasters said they would have confused these cupcakes for chocolate mint cupcakes if I didn't tell them otherwise (or if they weren't topped with basil leaves). However, the basil was different enough from mint for me to like it - I'm not a fan of mint.


I used basil grown in our own home garden, and I'm proud to enter this cupcake into this month's Grow Your Own roundup hosted by Amy of Playing House.


I love how the event logo looks just like the basil leaves on my cupcakes!

Vegan Chocolate Cupcakes with Basil Recipe

I found the recipe for vegan chocolate cupcakes on Kylie's blog, The Baking Bird. She got the recipe from the cookbook La Dolce Vegan!. Below is a reprinting of the recipe adapted to cupcakes with the addition of basil.

Makes about 20 cupcakes
  • 1/2 C unsweetened cocoa powder
  • 2 1/2 C flour
  • 1 3/4 C sugar
  • 1 1/2 t baking soda
  • 1/2 t salt
  • 1 C fresh basil leaves, packed firmly
  • 1/2 cup soft or silken tofu
  • 1 C soy milk
  • 1 T apple cider vinegar
  • 1 T vanilla extract
  • 1/2 C oil
  • 1/2 C water
  1. In a large bowl, whisk together the cocoa powder, flour, sugar, baking soda, and salt.
  2. In a food processor, chop basil finely.
  3. Add the tofu, soy milk, vinegar, vanilla, and oil to the food processor and process until smooth.
  4. Pour contents of the food processor into the bowl with the dry ingredients.
  5. Add the water.
  6. Stir together until fully combined.
  7. Fill cupcake liners 3/4 full.
  8. Bake at 350 F for 25 minutes or until cupcakes bounce back when touched.
The Frosting

I frosted the vegan chocolate cupcakes with vegan chocolate ganache.

Friday, July 24, 2009

peekfrostings

Vegan Frosting - Chocolate Ganache Using Tofu


I wanted a vegan frosting that didn't require margarine (most vegan frosting recipes that I found online called for margarine - yuck). Finally, I found a vegan frosting sans margarine that was worthy of topping a vegan Cupcake Project cupcake. It's a vegan chocolate ganache where tofu takes the place of the typical cream.

I waited until they were done enjoying the vegan cupcakes with vegan frosting before telling my tasters that the frosting contained tofu. They were shocked. It was not at all obvious.


The main difference between the vegan chocolate ganache and other chocolate ganaches is the texture. Typically, ganaches have a lustrous sheen. The vegan ganache had a definite matte finish. The texture was also different - it was thick, almost like brownie batter (tasted like it, too!). More pics are coming when I post the cupcakes. It looks a bit more attractive once it's all smoothed out.

Vegan Frosting Recipe

I got the vegan frosting recipe concept from the Vegetarian Times. Here is my altered version.
  • 1/2 C soft tofu (use less if you want it to be more creamy)
  • 2 3/4 oz chocolate (use your favorite brand of chocolate here - semi-sweet or dark both work)
  • 1/4 C sugar, optional (if you use dark chocolate or baking chocolate, you will need to add some sugar to give it sweetness)
  1. Melt the chocolate in a double boiler or in the microwave. (I usually microwave it. Put it in for thirty seconds, stir, and repeat until it's all melted.)
  2. Pour the melted chocolate over the tofu and stir until combined.
  3. If needed, mix in the sugar.

Sunday, July 19, 2009

peekfrostings

Peach Pie with Brie - Cupcake Style


Peach pie - sweet, gooey peaches, buttery crust, topped with cool, creamy vanilla ice cream - an irresistible summer dessert. Not able to leave a classic alone, I made two key changes to the traditional peach pie recipe:


  1. I added Brie cheese (full disclosure - I was given the Brie cheese for free from Ile de France so I had to do something cool with it! Thanks, Ile de France!!)Before you start doubting the peach pie with Brie cheese, consider the popular pie combination of apple and cheddar (cheese is not a new ingredient to the pie world). Then, think about a time when you've had baked Brie with fruit compote (if you've never had baked Brie with fruit, rectify that right now!). Brie goes really well with fruit. In the case of my mini peach pies, tasters could barely tell that the Brie was there unless they knew to look for it. It mostly added some complexity to the flavors, mixing a little sour into the otherwise sweet mix.
  2. I made the peach pies cupcake style. As you'll see as you move further into the post, I made the mini pies three different ways: crust cut out on top, lattice top, and peach juice pecan top.


Peach Pie with Brie Recipe

The Crust

If you already have a favorite pie crust recipe, feel free to use that. I used a recipe from the classic Vincent Price cookbook that is actually designed for an apple tart rather than a pie. I like that it has a mild lemon flavor. Crusts should have a flavor and stand up on their own, not just be a delivery mechanism for pie filling.

I've been using the Vincent Price recipe since I was a kid. You make the whole thing with your hands, and I've always loved the messiness of it. It doesn't roll out as well as some other crust recipes that I've tried, but to me it's worth the extra effort for the sublime flavor.

I'm reprinting the recipe below in my own words, with a slight modification from the original.

Double the recipe if you plan to put a lattice or top crust on your mini pies.

  • 2 1/2 C flour
  • 1/2 C sugar
  • 1 C (2 sticks) butter, room temperature
  • 4 egg yolks
  • Grated rind of one lemon
  1. Clean your counter well and pour flour onto the counter.
  2. Make the letter O with the flour and put all of the other ingredients in the middle of the O (see photo above).
  3. Using your hands, work the center ingredients into a paste and then knead in the flour. If necessary, dip your fingers in water while you are working to help the dough stick together better.
  4. Roll the dough into a ball and refrigerate for at least thirty minutes.
The Peach Filling

I got the recipe for the peach filling from allrecipes. I am reprinting it with slight modifications below.

  • 5 C sliced peaches (about 8 medium-sized peaches)
  • 2 T lemon juice
  • 1/2 C all-purpose flour
  • 1 C white sugar
  • 1/2 t ground cinnamon
  • 1/4 t ground nutmeg
  • 1/4 t salt
  1. Place the sliced peaches in a large bowl and sprinkle with lemon juice.
  2. Mix gently.
  3. In a separate bowl, mix together the flour, sugar, cinnamon, nutmeg and salt.
  4. Pour over the peaches, and mix gently.
Putting It All Together

As I mentioned at the beginning of the post, I made these mini pies three ways. However, the basic setup is the same and should make about 24 mini pies.

  • Unbaked pie dough (see above)
  • Prepared peach filling (see above)
  • 4 oz Brie cheese
  1. Remove half of the dough from the fridge and roll it out on a lightly floured surface to about 1/4 inch thick.
  2. Use a 3 1/2 inch diameter circle cookie cutter to cut the dough into circles. If you don't have a cookie cutter that width, see if you have a glass you can use or experiment with different widths.
  3. Put cupcake liners into cupcake tins.
  4. Press the center of your circle into the bottom of a cupcake liner and work the rest up the sides. It should come about 3/4 of the way up the side. I experimented with different heights and found this to be the most pleasing to me, but higher or lower won't destroy anything. Repeat the same procedure with the other half of the dough.
  5. Fill the pie crusts with slices of the prepared peach filling.
  6. Dot the top of the peach filling with small pieces of Brie (I used four pieces about the size of my fingertip). If you don't want to use Brie, you can dot with butter instead.
  7. Choose the option that you want for the top and assemble (these are covered later).
  8. Bake at 350 F for about 25 minutes.
Option One - The Little Pie Crust Cutout

For some of the mini pies, I topped the peaches and brie with some extra pie crust that I cut out using a tiny cookie cutter (OK - it was a tool from a Play-Doh kit). While I used stars, I think hearts would be really cute.

Option Two - The Classic Lattice

For other pies, I topped the peaches and Brie with a classic pie lattice. I cut out the strips of lattice using a pastry cutter to give them jagged edges.

Option Three - Peach Juice and Nut Goodness

For the remainder of the pies, I wanted to use up the sugared peach juice that was left over after I put all the peach filling into the pies. I had somewhere between a half cup and three quarters cup of sweetened peach juice left in my bowl. I mixed that with a quarter cup of flour to thicken it up and a quarter cup of pecans to add some crunch. Then, I spooned that mixture on top of the mini pies. While I liked all three varieties of pie, I think this one was my favorite.


On the left you can see the set up without the goodness on top.
On the right, you see it with the goodness spooned on.


Other Mini Pies

If you like the idea of making mini pies, you may also want to check out my recipe for mini pumpkin pies.

Wednesday, July 15, 2009

peekfrostings

Dinner Roll Recipe


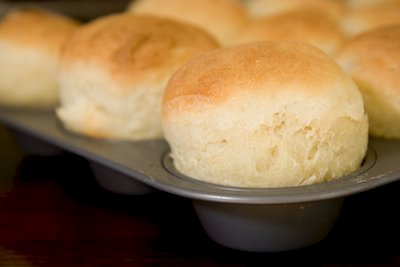
This dinner roll recipe was chewy and light on the inside with a crusty exterior. Yogurt gives this dinner roll recipe a bit of a tang and honey provides it with a subtle sweetness. To make the dinner roll recipe more cupcake fan friendly, I baked the rolls in cupcake tins. The rolls came out looking just like little bread cupcakes!

For kicks, you could "frost" them with some butter and jam!

The Dinner Roll Recipe

I got the dinner roll recipe from my Taste & Create partner this month, Robin at Hippo Flambe (is that not the coolest name for a blog?). Robin originally got the recipe from one of my favorite blogs, Baking Bites. I've reprinted the recipe here with my notes and the change to make them as cupcake rolls.

Makes about 12 cupcake-sized rolls
  • 1 1/2 - 2 C whole wheat pastry flour (I know it's uncool to say it, but I'm not a fan of whole wheat flour. I used entirely all-purpose flour for the rolls.)
  • 2 - 2 1/2 C all-purpose flour
  • 1 T active dry yeast
  • 3 T honey
  • 1 C tepid water (105° - 115° F)
  • 1 C yogurt (Robin used Greek style yogurt, as did I.)
  • 1 T extra virgin olive oil
  • 1 1/2 t salt
  1. If using both whole wheat and all-purpose flour, mix the two flours together in a bowl and set aside.
  2. In the bowl of a stand mixer, combine 1/2 cup flour (or flour mix), yeast, honey and tepid water.
  3. Stir well and let stand for 10 minutes, until bubbles form.
  4. With flat beater blade or a wooden spoon, stir in yogurt, extra virgin olive oil, salt, and 2 more cups of flour (or flour mix).
  5. Gradually mix in remaining flour until you have a soft dough that pulls from the sides of the bowl.
  6. Turn out onto a floured counter and knead by hand or use the dough hook attachment on an electric mixer. This should take about 5 minutes.
  7. Cover the bowl with a lid or a towel and let rise until the dough doubles in size, approximately 1 hour.
  8. Spray cupcake tins with non-stick baking spray or coat with melted butter.
  9. Break off pieces of dough and roll into balls that fill each cupcake slot. The balls should almost fill each depression. Both Hippo Flambe and Baking Bites go into detail about how to make sure that each roll is exactly the same size. I don't really care about homemade things all being the same size. I like that people can choose whether they want a bigger one or a smaller one.
  10. Cover with a clean, damp dish towel and let rise for 25 minutes. After rising, mine looked like the photo above.
  11. Bake at 375 F for about 20 minutes, until rolls are a deep golden brown on the top.
  12. Break one open and dig in!


Monday, July 13, 2009

peekfrostings

Why Does Cantaloupe Taste Like Corn?


"Thanks for the corn muffins!"
"These are awesome corn muffins!"

I'd be flattered if these were comments made after I served people corn muffins. In this case, I served cantaloupe cupcakes containing zero corn. I would be offended, only I had to agree that they tasted just like corn muffins! (My other recent cupcake, which also tasted like a corn muffin, at least contained corn meal.)

I happen to have two friends who are allergic to corn. This cupcake would be perfect for them or anyone else reading this who likes the taste of corn but suffers from corn allergies.

I can't begin to tell you why cantaloupe tastes like corn. Maybe it's the gritty texture and the mild sweetness? If you've got an idea, please let me know in the comments.

Cantaloupe Cupcake Recipe (AKA Fake Corn Muffins)


Makes about 13 cupcakes
  • 2 C flour
  • 1 1/2 t baking powder
  • 1/2 t baking soda
  • 3/4 C unsalted butter, softened
  • 2/3 C sugar
  • 2 eggs
  • 2/3 C sour cream or Greek yogurt
  • 2/3 C cantaloupe soup (see my post on cantaloupe soup) or pureed cantaloupe with 1/2 t ground ginger and 1 t lemon juice
  1. Whisk flour, baking powder and baking soda in a bowl.
  2. Beat butter and sugar in a large bowl for 1 minute, until light and fluffy.
  3. Beat eggs and sour cream into the butter/sugar mixture until blended.
  4. Alternately fold in flour mixture and 2/3 cup cantaloupe soup in three additions, beginning and ending with flour.
  5. Fill cupcake liners 3/4 full.
  6. Bake at 350 F for about 20 minutes or until toothpick comes out of cupcake clean.
The Frosting

Everyone's favorite part of these cupcakes was the lemon ginger whipped cream that I frosted them with. I used the cream whipper to make the whipped cream, but you could also make it with a regular mixer.
  • 1 C heavy whipping cream
  • 1/4 C powdered sugar
  • 1/2 t ground ginger
  • 1/2 t lemon extract
  1. Whip heavy whipping cream until it looks like whipped cream.
  2. Mix in everything else.
For extra fun, I topped some of the cupcakes with ginger-flavored pearl sugar. Flavored pearl sugars are a great alternative to sprinkles. Sadly, these gems are hard to come by. I found them at a local store that no longer sells them. The only place I've been able to find them online is a French site (it looks like they do ship to the US, but it's pretty pricey - lucky European readers).

Thursday, July 9, 2009

peekfrostings

How to Transport Cupcakes with Whipped Cream


I love frosting cupcakes with simple whipped cream frostings. When I need to transport the cupcakes in the summer heat, I always worry about the whipped cream becoming a big, melty mess.

What's a cupcake baker to do?

One option is to make the whipped cream frosting on site, which is messy - and who wants to shlep ingredients along to the party?

A better option is to use a cream whipper.


A cream whipper is an aluminum canister with a nitrous oxide charger that makes whipped cream on the fly. With a cream whipper, you can keep your cupcakes at room temperature and only worry about keeping the cream whipper cold (easily achieved in a small cooler). It's basically like making your own fresh Reddi-Whip.

The only downside of the cream whipper is that you can't put anything in it that isn't liquid or easily dissolved in liquid - so whipped cream with pieces of fruit, zest, or chunks of anything is out.

I was lucky enough to receive a free Liss Dessert Chef Cream Whipper to try out. But, they really aren't as expensive to buy as you might think. Liss is offering an awesome deal just for Cupcake Project readers. You can get one directly from them for $35.95.

Once I figured out how to use the cream whipper (the instructions were quite confusing), I really loved the product.

Step-by-Step Guide to Using the Lis Dessert Chef Cream Whipper

1. Begin by putting in your ingredients. A basic whipped cream frosting contains 1 cup of heavy whipping cream and 1/4 cup powdered sugar. Add to that whatever flavors you like. For example, I made a lemon ginger whipped cream by adding 1/2 t lemon extract and 1/2 t ground ginger to the cream and sugar.

2. Put the rubber ring seals on top of the canister.
3. Screw on the top.

4. The charger (the thing that looks like a little bullet) comes in a separate box. Place a charger in the charger holder and screw it on to the lid. It may make a hissing sound. Do not fear. Note that you can only use a charger one time.

6. You are now ready to shake.


7. Shake the whole thing four or five times. It doesn't have to be miles away from your body like in the photo - I was just being dramatic about it.


8. Remove the charger holder. Replace the charger with the black nubby circle. Screw one of the two tips included with the cream whipper onto the the lid.

9. Frost away. I haven't yet mastered the art of pretty piping with the cream whipper, but it sure is fun!! You can even let your guests do their own frosting. Kids will LOVE it!

Monday, July 6, 2009

peekfrostings

Chilled Cantaloupe Soup with Lemon and Ginger


Why did gazpacho (which in my opinion is simply salsa disguised as a soup) become *the* chilled soup? The other day while attending the Saucy Soiree (an event by the St. Louis food magazine that Jonathan freelances for), I made a new friend - chilled cantaloupe soup. The chilled cantaloupe soup was prepared by Highway 61 Roadhouse & Kitchen. It was sweet enough to be served as dessert, especially since it was topped with pieces of praline. However, it would also work as a great appetizer. I decided I'd have to try to make this refreshing summer treat myself.

After browsing an array of cantaloupe soup recipes, I came accross one that stood out on Organic Valley's website - cantaloupe soup with lemon and ginger. The ginger added a little kick to the soup and the lemon made it extra fresh and summery.

Here is the recipe, with some slight modifications:

Serves 8
  • 2 T butter
  • 2 T honey
  • 1 T finely grated fresh ginger root
  • 1 heaping T finely grated lemon peel
  • 6-7 C coarsely chopped, fully ripe cantaloupe (For me, this was one medium-sized cantaloupe. You might want to buy two just to be safe.)
  • 1 1/2-2 C milk (I used 2%)
  • 8 sprigs fresh mint (I used basil instead since we had some fresh in our garden)
  1. Place butter, honey, ginger root and lemon peel in a small bowl.
  2. Microwave until butter is fully melted, about 45 seconds.
  3. Stir to blend mixture.
  4. Use a rubber spatula to scrape mixture into a food processor or blender.
  5. Add melon chunks and puree until as smooth as possible.
  6. Stir in milk.
  7. Transfer to a bowl, cover, and chill thoroughly (4 or more hours).
  8. Garnish each serving with a mint or basil sprig. (Serving in a hollowed out cantaloupe is a nice effect, but obviously optional.)
  9. Don't eat it all because you can use some to make cantaloupe cupcakes - recipe coming soon!
Real Time Web Analytics