Friday, January 29, 2010

Vosges Chocolate Truffles

StumbleUpon Stumble This Post

The other day, I participated in a hamburger tasting (Andrew Mark Veety's quest to find the best hamburger in St. Louis). One of the tasters was Riverfront Times blogger Kelli Best-Oliver. In writing up the event, she described her perfect restaurant hamburger: "Basically, I want restaurants to make the burger I make at home better than me." If I took this description and applied it to truffles, my perfect truffle would be a Vosges chocolate truffle. While I don't often make truffles at home (OK - I've only made homemade truffles once), Vosges does truffles the way that I would make them myself, only better.

Like my experimental cupcakes, Vosges makes truffles that push the envelope of what you'd expect to find in a dessert.


Vosges sent me their Sweet Coquette Collection for review. In Vosges's own words, "The Sweet Coquette Collection uses chocolate as the medium for illustrating an array of famed aphrodisiacs that drew their histories from various parts of the world." The collection contains truffles with Chinese star anise, rose water, pistachios, oysters, champagne, mamajuana (I had never heard of this drink from the Dominican Republic - it's now on my tasting list), chilies, and more. While you may not like them all, this is definitely the Valentine's Day truffle collection for the adventurous eater.

Do the Vosges Truffles Work as an Aphrodisiac?

;)

Yes, There is a Cupcake Tie-In

Coming up next, you'll see my Ultimate Truffle Cupcakes. The cupcakes feature both these chocolate truffles and truffle honey.


Read the rest of this post...

Tuesday, January 26, 2010

Truffle Honey for Your Honey

StumbleUpon Stumble This Post

Chocolate truffles in a heart-shaped box are a Valentine's Day staple. In fact, I'll be telling you about some of my favorite chocolate truffles in my next post. However, if you are looking for something different for your honey this Valentine's Day, consider the other variety of truffle - fungi! Specifically, I recommend getting your sweet thing a jar of truffle honey.

I first experienced truffle honey during a trip to a local restaurant, FIVE Bistro. FIVE serves truffle honey with its cheese plates; that in itself is a reason to go to there. The salty cheese dunked in sweet honey with the distinctive musky taste of truffle is a must try!

I will warn you that truffles are an acquired taste. On the same night that I discovered truffle honey, several of my dining companions were disgusted by it. I could barely come down from my place in heaven to hear their complaints, but it wouldn't be nice of me to not warn you that truffle honey isn't for everyone.

Where Can I Buy Truffle Honey?

Back in June, I first met (online) Justin from Marx Foods. He wanted me to review Marx's palm leaf plates (I loved them). When I was browsing Marx's site, I discovered that they sold truffle honey. I immediately began hinting strongly that while the plates were nice, what I really wanted to review was the truffle honey. Seven months later, Justin sent me some. Woohoo!

The truffle honey from Marx Foods was dreamy. Of course, I used some in a cupcake, but I saved enough to eat with bread and cheese and I licked every last morsel of truffle honey out of my measuring cup. The honey costs $31.50, which is less than a box of chocolate truffles might cost.

Give it a try!


Read the rest of this post...

Friday, January 22, 2010

Lamington Cupcakes - Cupcake Cubes Frosted on All Sides

StumbleUpon Stumble This Post

"Think Lamingtons," said Peter of Delicious Delicious Delicious at the conclusion of an email he sent urging me to enter his blog contest, Re-inventing the Lamington. Before I could re-invent the Lamington, I had to find out just what a Lamington was!

What are Lamingtons?

If you are in Austrialia or New Zealand, you probably find it funny that I need to ask what Lamingtons are. In Australia, there is even a National Lamington Day, which falls on July 21.

Lamingtons are a sponge cake or butter cake cut into cubes, dipped in chocolate, and then dipped in dessicated coconut (read more in the Lamington Wikipedia article). Sounded good to me!

How Did I Re-invent the Lamington?

In Peter's Re-inventing the Lamington contest, he challenged participants to come up with a recipe for Lamingtons with a difference. After reading numerous articles on Lamingtons, I learned that one of the more difficult parts of Lamington making is that cutting the cake into cubes may produce lots of crumbs. The crumbs end up gunking up the frosting.

I decided that instead of baking a cake and cutting it into cubes, I would start with cubes and make Lamington cupcakes! I purchased square silcone cupcake liners from Wilton (if you are in St. Louis, you can pick some up at Kitchen Conservatory). The neat thing about using silicone is that the cupcakes easily come in and out of the liners. I was able to remove the cupcakes, frost on all sides, and then put them back in their liners. As you can see above, when the cupcakes were returned to the liners, no one would ever know that they were frosted on all sides. The tasters found a happy surprise of frosting on each side of the cube!

Another (less exciting) change that I made was to decorate half of the cupcakes with coconut and the other half with white sprinkles. Bride and Groom 3.o don't like coconut, but they do like sprinkles!

How to Make Lamington Cupcakes

I got the recipe for the Lamingtons from allrecipes. I am reprinting it below with changes to make it into cupcakes and changes to the frosting to make it a bit less thick and a bit less sweet.

Note: Bake the Lamington cupcakes a day before you want to serve them. The cake needs to sit out overnight to get a bit stale before it is frosted. Trust me - you'll like the stale cake. Frosting it on all sides moistens it up.

Makes 12 cupcakes

For the cupcakes:

  • 1/2 C unsalted butter
  • 3/4 C white sugar
  • 1 t vanilla extract (I used vanilla bean paste)
  • 2 eggs
  • 2 C all-purpose flour
  • 4 t baking powder
  • 1/8 t salt
  • 1/2 C milk
  1. Sift together the flour, baking powder, and salt. Set aside.
  2. In a large bowl, cream together the butter, sugar, and vanilla until light and fluffy.
  3. Add the eggs one at a time, beating well with each addition.
  4. Add the flour mixture alternately with the milk; beat well.
  5. Set silicone cupcake liners on a baking sheet and fill them 3/4 full.
  6. Bake at 350 F for 20 minutes or until a toothpick inserted into the cake comes out clean.
  7. Leave out uncovered overnight.
For the frosting:
  • 3 C confectioners' sugar
  • 1/3 C unsweetened cocoa powder
  • 2 T unsalted butter, melted
  • 1 C heavy whipping cream
  1. In a large bowl, combine confectioners' sugar and cocoa.
  2. In a saucepan, heat heavy whipping cream and butter until the butter is melted.
  3. Add the hot mixture to the sugar mixture and mix well to create a fluid, but not too runny, frosting.
Putting it together:
  • 1 (8 ounce) package flaked coconut or a lot of white sprinkles or anything else fun that you can think of to decorate with (pink sugar hearts for Valentine's day, green shamrocks for St. Patty's day, etc.)
  1. Place your topping into a small shallow bowl.
  2. Remove cupcakes from liners.
  3. Using a fork or a long toothpick or your fingers (if you've cleaned them well, are willing to get messy, and are able to resist the urge to lick them) dip each cube into the icing, then roll it in the topping.
  4. Return the cube to its silicone liner. Continue for each piece.


Read the rest of this post...

Monday, January 18, 2010

Volcano Cake - Cupcake Style

StumbleUpon Stumble This Post


My quest to take volcano cake and turn it into volcano cupcakes began when my Twitter (and real life) friend Linda from Free Range Cookies (home of some of the best gluten-free baked goods in St. Louis) asked the following:

Truth be told, I had never heard of volcano cake or volcano cupcakes. But, I got excited about the idea!

I found the video below about volcano cake on YouTube and thought that volcano cupcakes would make the most awesome party cupcakes ever!!


But, being me, I decided to do things a bit differently. I saw a recipe for plum upside down cake on Simply Recipes and it occurred to me that the plums strongly resembled molten lava (if you use your imagination). So, instead of a plain white cake with chocolate frosting, I decided that I would use plum upside down cupcakes as my volcano cupcakes. I was happy with this choice. Not only did the upside down cupcakes look like little volcanoes, but they also tasted better than your average volcano.

Unfortunately, I was not thrilled with the eruption part of my volcano cupcakes. There were two problems that I faced:
  1. When you make a volcano cake, as shown in the video above, you embed a glass in the cake to contain the dry ice and liquid. I did not have any glass small enough to embed in a cupcake. I tried lining the hollowed out cupcake center with foil and plastic wrap, but I was not able to keep the liquid from being absorbed into the cake.
  2. I was unable to get a really big and dramatic eruption. I could only achieve small puffs of smoke. Lots of dry ice = big eruption. Tiny pieces of dry ice = tiny eruption.
Please share in the comments any suggestions that you have for how to solve these quandaries. I'd love to hear your thoughts and successes.

In the meantime, I will share with you the method that worked best for me. Even though I wasn't thrilled with the results, I still think it could be fun for a party. But, really, I think anything involving dry ice is fun (except for touching it!).

How to Make Volcano Cupcakes

1. Make the upside down cupcakes:

As I mentioned above, I used Simply Recipe's plum upside down cake recipe for the cupcakes. I have reprinted the recipe below (I modified it slightly to turn it into cupcakes).

Makes 24 cupcakes
  • 1 1/2 C unsalted butter (3 sticks), room temperature
  • 3/4 C brown sugar, firmly packed
  • 4 plums, pitted and sliced
  • 1 C buttermilk
  • 2 1/4 C cake flour
  • 1 1/2 t baking powder
  • 1/2 t baking soda
  • 1 t cinnamon
  • pinch salt
  • 1 1/2 C granulated sugar
  • Zest of 1 orange
  • 3 eggs
  • 3 t vanilla extract
  1. Melt 3/4 cup of the butter in a medium saucepan over medium heat.
  2. Add brown sugar and whisk until smooth.
  3. Line two cupcake tins with cupcake liners. Pour the mixture into the liners, dividing the sugar/butter sauce evenly among them.
  4. Arrange a layer of plum slices on top of the mixture as shown in the photo above.
  5. In a medium-sized bowl, sift together the cake flour, baking powder, baking soda, cinnamon and salt.
  6. Use an electric mixer to beat together the remaining 3/4 cup butter with the granulated sugar and orange zest.
  7. Add the eggs and vanilla, mix to combine.
  8. Alternately add the dry flour mixture and the buttermilk to the batter.
  9. Divide the batter among the cupcake liners.
  10. Bake at 350 F for 25 minutes, until cupcakes are firm to the touch, and a toothpick or skewer inserted in the center does not come out with raw batter on it. (Might be wet from plum juice.)
  11. Remove from oven and let cool on a rack until no longer hot to the touch.
  12. Unwrap the cupcakes and turn them upside down.
2. Acquire dry ice:

The difficult part about this step is finding dry ice. Some ice cream shops keep dry ice on hand and may be willing to sell it to you with or without the purchase of ice cream. I was able to find (after my husband made a bunch of phone calls) a local dry ice supplier, Arctic Ice. They were super nice and even chopped the ice for me so I wouldn't need a hammer (like the folks in the video).

Store your dry ice in a cooler, not in the freezer (the guy at Arctic Ice said the freezer is the worst place for dry ice) and use it within 24 hours.

3. Prepare the cupcakes:

I chose to put my cupcakes on that cheesy fake grass stuff that you find on patios. You can buy a few feet of it really cheaply at Home Depot or Lowes. If you are having a party, you might consider using the fake grass as your tablecloth!

I put some graham crackers around the volcanoes to act as rocks. You can buy them or make homemade graham crackers.

Make a hole in the middle of each cupcake that goes almost all the way to the bottom.

Line the holes with something that will keep the liquid from getting into the cake. As I mentioned above, I tried foil and plastic wrap and neither worked very well; maybe you have a better idea.

4. Drop in a small piece of dry ice:

Drop a small piece of dry ice into each of the holes. Make sure that you press it down to the bottom of the hole. Be careful not to touch the dry ice!

5. Create the poof:

Mix a little bit of red food coloring in with some boiling water and drop a few spoonfuls of the mixture onto the dry ice. Poof - eruption! Again, I warn you, it's not the most dramatic Hollywood effect. But, you guys are smart. I bet you can play with it and make these the most awesome party cupcakes ever!

Parting Photo

I leave you with a photo of Jonathan and me in front of the only active volcano I've ever seen, Tungurahua. It's one of my favorite photos from our honeymoon in Ecuador.


Read the rest of this post...

Friday, January 15, 2010

New Cupcake Project Cupcakes on Paula Deen - Hot Buttered Rum Mugcakes and Eggnog Bread Pudding Cupcakes

StumbleUpon Stumble This Post

If you haven't been over to Paula Deen's site recently, what are you waiting for? There are two new Cupcake Project cupcakes that can only be found there - Hot Buttered Rum Mugcakes and Eggnog Bread Pudding Cupcakes.

Happy Baking!


Read the rest of this post...

Wednesday, January 13, 2010

Maple Oatmeal Mustard Muffins

StumbleUpon Stumble This Post

I really wanted these maple oatmeal mustard muffins to be cupcakes. I even thought about calling them cupcakes, but in the interest of blog integrity, I must admit that they were muffins. The problem, you see, was the white whole wheat flour. I'd never used white whole wheat flour before, but I'd heard rumors that it tasted just like white flour while retaining the health value of whole wheat. Not true. Even though only half of the flour I used was white whole wheat flour (the other half was all-purpose), these wannabe cupcakes tasted like whole wheat muffins.

Despite the fact that muffins are the geeky friend of the hipster cupcake, these muffins have nothing to be ashamed of. They have the tender sweetness of maple, the in-your-face texture of oatmeal, and a surprise sassy kick from the mustard. They were a huge hit with my moms' group (winning out over a chocolate cupcake that I made for a Scharffen Berger contest and Panettone Cupcakes).

The Maple Oatmeal Mustard Muffin Recipe


Makes 16 muffins

First, make an oatmeal mixture:

  • 1 1/2 C rolled oats
  • 1/2 C maple sugar
  • 1 t cinnamon
  • 2 T whole mustard seeds
  • 6 T unsalted butter, melted
  1. Mix together oats, maple sugar, cinnamon, and mustard seed.
  2. Mix in melted butter and stir well.
  3. Set aside.
Then, make the cake batter, combine with the oatmeal mixture, and bake:
  • 1 C white whole wheat flour (you could use regular whole wheat or simply all-purpose)
  • 1 C all-purpose flour
  • 1 t baking powder
  • 1 t baking soda
  • 1/4 t salt
  • 1/2 C maple syrup
  • 1/2 C sunflower oil (you could use canola oil)
  • 2 eggs, lightly beaten
  • 1 C Greek yogurt (you could use plain yogurt)
  • 1 t vanilla bean paste (you could use vanilla extract)
  • 4 t whole grain mustard
  1. In a large bowl, combine flours, baking powder, baking soda, and salt.
  2. In a separate bowl, beat maple syrup, oil, and eggs until well blended.
  3. Stir in yogurt, vanilla, and mustard.
  4. Add wet ingredients to dry ingredients all at once, and mix by hand until evenly combined.
  5. Stir in oatmeal mixture.
  6. Fill cupcake liners 3/4 full.
  7. Bake at 350 F for 25 minutes, or until a toothpick inserted in a muffin comes out dry.
Last, top with a maple glaze:
  • 1/3 C powdered sugar
  • 3 T maple syrup
  1. Mix powdered sugar and maple syrup and spread on cooled muffins.
Credits


Read the rest of this post...

Tuesday, January 12, 2010

Homemade Salad Dressing - Mustard, Onion, and Maple

StumbleUpon Stumble This Post

Growing up, my dad made homemade salad dressings. He would mix together mayo, mustard, cocktail sauce, and some spices and - poof! - we had a homemade dressing that was better than any store-bought Thousand Island dressing I've tasted. I learned from him that salad dressing doesn't have to come in a bottle. As an adult, I've concocted all sorts of different homemade salad dressings. One of my favorite homemade salad dressings (although quite pricey) is a simple mixture of saba (a sweet and thick aged balsamic) and truffle oil.

For this month's Taste & Create, I was paired with Megan of A Bolder Table. Megan had a recipe for a cipollini onion, mustard, and maple salad dressing that not only sounded complex and appealing, but also seemed like a flavor combination that would make for a very interesting cupcake (it did).

What is a Cipollini Onion?

Cipollini onions are some of the babies of the onion world - they fit in the palm of your hand.

My love of things small extends beyond tiny cakes; I also have a particular affection for these mini onions.

As far as taste goes, cipollini onions are mild and they are sweeter than some other varieties of onions. If you can't find cipollini onions in your local markets, I would recommend using a yellow onion. One large yellow onion would be about the same size as the four cipollini onions that this recipe calls for.

Mustard, Onion, and Maple Salad Dressing Recipe

Megan's mustard onion and maple salad dressing recipe was more of a recipe framework than an actual recipe. She lists the ingredients that she used and indicated which ones she used more than others, but not the exact proportions. Below, you'll find the exact proportions that I used. Jonathan is already begging me to make this homemade salad dressing again, and since it's far healthier than a cupcake, I probably should.

Makes enough for four small bowls of salad

  • 4 cipollini onions
  • 3/4 C extra virgin olive oil
  • 3 T whole grain mustard
  • 2 T maple syrup
  • 2 t apple cider vinegar
  • 2 t soy sauce
  • 1 t hot sauce (I used Sriracha sauce.)
  1. Finely chop the onion and saute in the olive oil until fragrant and golden brown.
  2. Remove from heat and let cool.
  3. Transfer to food processor and process until thick and pasty.
  4. Put all other ingredients in the processor and blend until combined.
  5. Serve immediately or store in the refrigerator for up to two weeks.


Read the rest of this post...

Wednesday, January 6, 2010

Cupcake Necklace Giveaway!

StumbleUpon Stumble This Post

Update: Comment number 140, Alanna, has won the pink necklace! Congrats, Alanna!! Thanks to everyone who entered.

My new advertiser, Dazzle & Chunk (look to the left if you aren't reading this in an RSS reader or by email), was sweet enough to send me one of her totally adorable cupcake necklaces. I wore it for the first time the other day and got tons of compliments on it.

Not only do I love the cupcake necklace, but Myles is quite interested in it as well.

Want one?

Dazzle & Chunk is offering a free cupcake necklace to a Cupcake Project reader! You can choose from blue, white, or the pink that I'm wearing in the photos. Leave a comment with your email address and which color you'd like and you'll be entered for a chance to win. I will randomly draw a winner on Monday, January 11th at 11:59PM CST. Good luck!!


Read the rest of this post...

Saturday, January 2, 2010

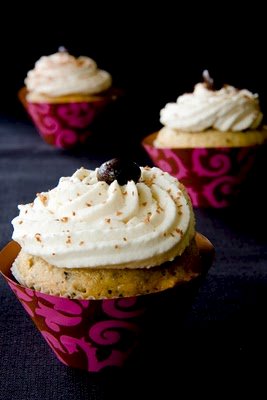
Mudslide Cupcakes with Baileys Irish Cream Whipped Cream

StumbleUpon Stumble This Post

The expression "Don't judge a book by its cover" should never apply to cupcakes. While these mudslide cupcakes are tasty, their cover (a sweet Baileys Irish Cream whipped cream) is the exceptional part. In fact, several tasters said that they would have been happy to eat a big bowl of the whipped cream sans cupcake.

You'll see in the video at the bottom of this post (if you are the video watching type) that Bride and Groom 3.0 found the mudslide cupcakes to be a bit dry. I say that if you have the cupcakes with a big bite of the Baileys whipped cream and perhaps a sip of coffee with some more of the whipped cream on top, you've got yourself a moist and memorable morning treat.

Baileys Irish Cream Whipped Cream Recipe

The Baileys Irish Cream whipped cream frosting is such an important part of this cupcake that I am putting the frosting recipe first!

  1. Whip heavy whipping cream until it looks like whipped cream.
  2. Mix in sugar and Baileys Irish Cream until just combined.
Note: You may find yourself wanting to double the recipe if you like gobs of frosting. I'd suggest stocking up on some extra heavy whipping cream.

Mudslide Cupcake Recipe

Makes 12 cupcakes
  • 2/3 C sugar
  • 2 C flour
  • 1 1/2 t baking powder
  • 1/2 t baking soda
  • 3 T ground coffee (your favorite kind)
  • 3/4 C unsalted butter, room temperature
  • 2 eggs
  • 2/3 C melted vanilla ice cream (you could also make this with coffee or mocha ice cream)
  • 1/4 C homemade Kahlua (store-bought would work just fine)
  • 1/4 C homemade Baileys Irish Cream (store-bought would work just fine)
  • A little bit of chocolate for shaving on top (optional)
  • 12 chocolate-covered espresso beans (optional)
  1. Whisk flour, baking powder, baking soda, and coffee in a bowl.
  2. Beat butter and sugar in a large bowl for 1 minute until light and fluffy.
  3. Beat eggs, ice cream, Kahlua, and Baileys into the butter/sugar mixture until blended.
  4. Fold in flour mixture.
  5. Fill cupcake liners 3/4 full.
  6. Bake at 350 F for about 25 minutes or until a toothpick comes out of the cupcake clean.
  7. Top with Baileys Irish Cream whipped cream (see above), shaved chocolate, and a chocolate covered espresso bean.
Bride and Groom 3.0 Mudslide Cupcake Video Review

This video not only contains the mudslide cupcake review but also some marital advice involving bodily functions. I think it may be the first time the f-word has been used on this site (the one that rhymes with heart - did you think I meant the one that rhymes with luck?).


Happy 2010!

I want to take a moment at the end of this long post to wish all of my readers a Happy 2010! Did you make resolutions? I'm not big on resolutions, but I've made one that requires no effort on my part:
If I win Birdie's Resolution Contest, I will get a cute new blog design in 2010. Wish me luck! If you'd like, you can enter, too, on Gisele Jaquenod and Birdie.

Footnote: Thanks again to Sugar Cat Studio for the sensational cupcake wrappers!


Read the rest of this post...